On the first sight, the Ricoh Theta S has a rather unusual design compared to a usual cameras. But wait, this is a 360 degree camera, so it has to be somehow different. To understand how it can make 360°x360° images and videos, it helps to view it from the side.
There are fisheye lenses on both sides of the device, which each can see more then 180°, so the camera can create a full 360 view by stitching the two images together.
Stand alone photography or video shooting is straightforward
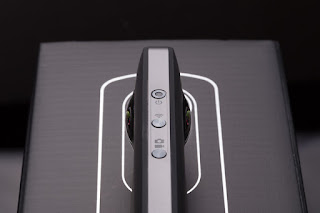
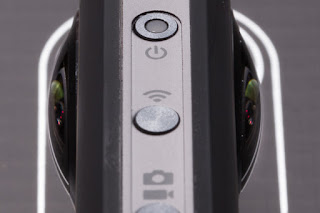
- Power on the device using the power switch (topmost button in the side)
- choose between photo or video mode using the mode switch
- position camera and press the trigger button on the front side, bam thats it.
Mobile apps for iOS and Android allow remote controlling the camera
The Theta S comes with a build in wifi, you can enable using the middle button at the side of the device. So you can use it wherever you want.
- Download the Theta S app from the App Store
- Switch on the camera
- Enable wifi
- Connect your smartphone
I only tested the iOS app. This app allows you to remote control the Theta S. In photo mode, you can preview the 360° images, in video mode you do not see the actual camera view, you can only start / stop recording. You can later download the created video into the app and view it. Also in VR mode, using the gyroscope of your phone to control movement and in stereoscopic view to use with google cardboard or other devices of this kind. The iOS app will not work with the camera, when the camera is in live streaming mode.
By the way, you might want to change the wifi password, as the default is the numeric part of the wifi SID, visible to everyone close enough to access your wifi signal. You can do this after connection the app, within the app.
Live Streaming mode
Before you start
Most of this section I learned from this blog post on schleeh.de (in german)
Download and install two software modules from Ricoh for the camera. "Theta App" and "Theta UVC Blender".
The first one is helpful to update the firmware of the camera. Connect the camera via USB to your mac and start the app. Then select the firmware update option in the file menu. An update will only happen, if the batteries are suitably charged.
The second app will register a video driver that provides a stitched video channel with the full 360 video. If you use the theta S camera directly, you will rather see a video with two circular images showing a half sphere side by side. So for live streaming you should use the UVC blender.
Now that everything is prepared you can ...
Start streaming
I always start with a disconnected, powered off camera.


- To enable live streaming mode, hold down the mode button while powering on the Theta S. The camera will then start in live streaming mode, indicated by a blue "live" on the camera front.
- Connect the camera to your computer. As I currently can not stream a HDMI signal to my Mac, I use USB. HDMI video quality will likely be better, but I would need extra hardware like Blackmagic Design UltraStudio Mini Recorder
which I currently do not own.
- Choose the channel you want to stream to. I tried google hangouts on air. This seems to be the easiest way to live stream, as it does not require any additional broadcaster software. Using only myself to share with and started the hangout. a captured video of this stream will be available in your youtube channel. (this might require some user validation before you can start)
- I created an event and started the hangout. Than I selected the UVC blender camera as video source. To do this in hangout, select the settings icon
 and choose the "THETA UVC Blender". This was basically it. I could start broadcasting.
